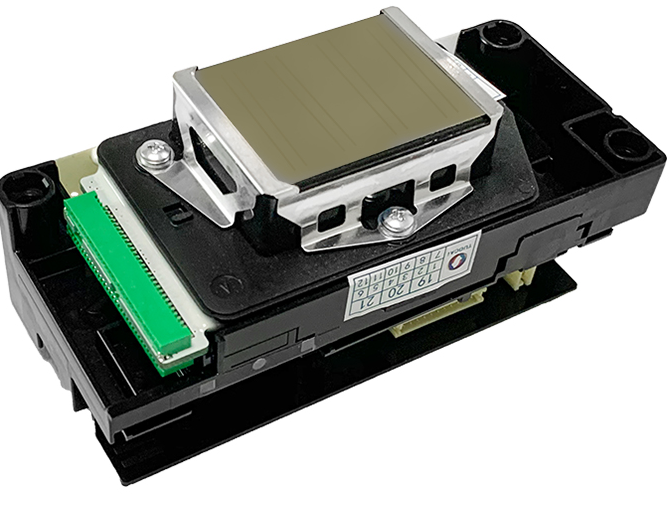
To replace the Mimaki CJV 150 printhead, first, discharge your static charges and unplug the Mimaki CJV 150. Then clean the printhead replacement and remove the older printhead. Install the new printhead and do a printing check. If you get an error code, solve the issue. Your Mimaki CJV150 printhead is now replaced.
Do you want to know more about the Mimaki CJV150 printhead replacement? Do not worry. In this article, I will describe in detail how to replace the printhead of your printer.
Mimaki CJV150 Printhead Replacement Step-by-Step
To replace the Mimaki CJV 150 Printhead, follow this method:
Tools Needed
- A Canned air
- Some cleaning fluid
- A Drip pan
- A syringe
- The new printhead

Step 1: Discharge Static
Before replacing the printhead you need to discharge the static charge stored in your body. This has to be done in order to avoid damaging the sensitive electrical components of the printer.
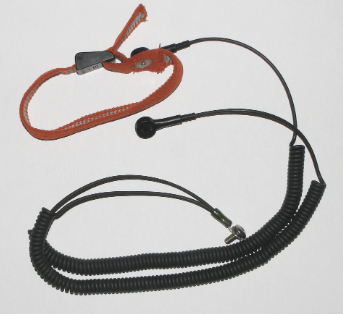
To discharge the static electricity of your body you can wear a grounding strap on your wrist:

Connect the grounding strap to a large metal object such as a table leg or a radiator. This will prevent your Mimaki CJV 150 from getting damaged by electrical discharge.
Step 2: Turn Off the Printer
Turn off the Mimaki CJV 150 before you do the printhead replacement. Unplug the printer and leave it in this state for 15 minutes. This will get rid of the residual electricity in the Mimaki CJV 150. As an added measure, try to turn on the printer while it is unplugged to get rid of any remaining residual electricity.
Step 3: Clean The New Print Head
You need to clean the printhead that you are going to be installing before doing the replacement. To clean the new print head, follow these steps:
- Blow the canned air through the nozzles of the print head.
- Inject cleaning fluid into the nozzles using the syringe with very little pressure.
- Blow more canned air through the nozzles to remove the cleaning fluid.
Step 4: Remove The Old Print Head
To install the new print head you first need to remove the faulty print head from the Mimaki CJV 150. To remove the old print head, follow these short steps:
- Remove the printer cover of the Mimaki CJV 150.
- Then remove the carriage cover from the printer.
- Label the ink lines that have the same color using a marker.
- Disconnect and remove the ink lines.
- Remove the damper while ensuring that the clear membrane remains untouched.
- Disconnect the FPC cables of the printer.
- Carefully remove the print head from the Mimaki CJV 150.
Step 5: Install The New Print Head
To install the new print head, follow this process:
- Put the new print head in place of the old one.
- Connect the FPC cables.
- Reapply the dampers.
- Reconnect the ink lines based on the labeling you did earlier.
- Put back the carriage cover of the Mimaki CJV 150.
- Reattach the printer cover.
Step 6: Inspect The Print Head
After doing the print head replacement on your Mimaki CJV 150 you will need to do a nozzle check. To do a nozzle check follow this process:
- Tap on the FUNC1 button. This will take you to the information Menu of the Mimaki CJV 150.
- Locate the “Nozzle Check” option on the information menu.
- Tap on the DOWN button until you reach the “Nozzle Check” option.
- Press the ENTER button. This will take you to the “Nozzle Check” menu.
- Go to the “Printing check” option by pressing the DOWN button as many times as necessary.
- Press the ENTER button.
- Go to the “ON” option by pressing the DOWN and UP buttons and then press ENTER.
- Adjust the nozzle check interval by pressing the UP and Down buttons. The “LENGTH” value determines the number of lines that will be printed before the nozzle check starts. The “File” value, however, determines the number of files that will be printed before the nozzle check is performed.
- Press the ENTER key twice. This will cause the “Action Setting Menu” to be displayed.
- Press the ENTER key again. This will select the “Cleaning Type” option.
- Use the UP and DOWN buttons to select “OFF” to turn off this option. This is because you already cleaned the new print head in step 3.
- Press Enter.
- Use the UP and DOWN buttons again to set the “Retry Count” to 3.
- Press the POWER button.
The Mimaki CJV 150 will do a print check to inspect the new print head. You may see problems like green output instead of blue. If there is a problem with the new print head you will get an error message on the display.
These are the error messages that are associated with a printing check error:
| Error code | Meaning | Solution |
| Nozzle MissingPrint Stopped | Nozzle check found multiple nozzles missing and stopped the printing | Clean the print head of the Mimaki CJV 150 and unclog the nozzles of the head. |
| NCU FLUSH POSNozzle check OFF | The discharge position adjustment with the NCU failed during the nozzle check | Check the nozzles for ink droplet misalignment and frequent nozzle missings and conduct nozzle cleaning. |
| NCU CENTER POSNozzle check OFF | The discharge position adjustment with the NCU failed during the nozzle check | Check the nozzles for ink droplet misalignment and frequent nozzle missings and conduct nozzle cleaning. |
| NCU SN ADJSTNozzle check OFF | The NCU failed to adjust the sensitivity of the print head during Printing Check | Check the nozzles for ink droplet misalignment and frequent nozzle missings and conduct nozzle cleaning. |
| NCU NZK CHK (HW)Nozzle check OFF | The ink discharge can not be recognized by the NCU. This is due to frequent nozzle missings and the misalignment of ink droplets | Check the nozzles for ink droplet misalignment and frequent nozzle missings and conduct nozzle cleaning. |
| NCU NZK CHK (MARK)Nozzle check OFF | The ink discharge can not be recognized by the NCU. This is due to frequent nozzle missings and the misalignment of ink droplets | Check the nozzles for ink droplet misalignment and frequent nozzle missings and conduct nozzle cleaning. |
| NCU CONNECT | Nozzle Check Test can not be performed as the NCU connection can not be detected. | Unplug the Mimaki CJV 150 and wait for a while. Then turn it back on again and restart the nozzle |
| REPLACE NCU | The sensitivity of the NCU is inadequate for performing Printing Check. | Replace the NCU |
If you did not get any error code then the Printing Check was completed successfully. But avoid inhaling the sublimation fumes. The print head of your Mimaki CJV 150 is now complete. If this procedure seems too difficult, you get a Roland BN 20 instead.
FAQ’s
How fast is Mimaki CJV 150?
The Mimaki CJV 150 is 56.2 m2/h fast. This makes the Mimaki CJV 150 a very fast printer. To attain these speeds, the Mimaki CJV 150 uses proprietary inkjets and SS21 quick-drying ink.
When did the Mimaki CJV 150 come out?
The Mimaki CJV 150 came out for the first time in October 2014 in the US. The first shipments of the Mimaki CJV 150, however, were made in November of that same year.
What country is the Mimaki printer from?
Mimaki printer is originally from Japan. Mikami Engineering was established in August 1975. Since then Mimaki has turned into a global printer brand. Mimaki printers are currently being produced in many countries including Taiwan, China, Japan, and Germany.
Conclusion
So, now you know all there is to know about Mimaki CJV 150 printhead replacement. The Mimaki CJV 150 is a very expensive printer that uses many sophisticated parts. Replacing the printhead can be a very costly option for most people. For this reason, you should do regular maintenance of your Mimaki CJV 150 to avoid damage to the printhead.
That is all for today. Thank you for reading my article. Goodbye and Goodluck with your Mimaki CJV 150 printhead replacement.

Emily loves making things special.
She’s also a mom and a wife who enjoys crafting and runs a small business from her home. She knows that the little things can make a house feel like a warm and loving home. This belief has led her to explore the exciting world of sublimation, a crafty way to add a personal touch to just about anything. Her website shares valuable information about sublimation, her crafty ideas, and tips.

